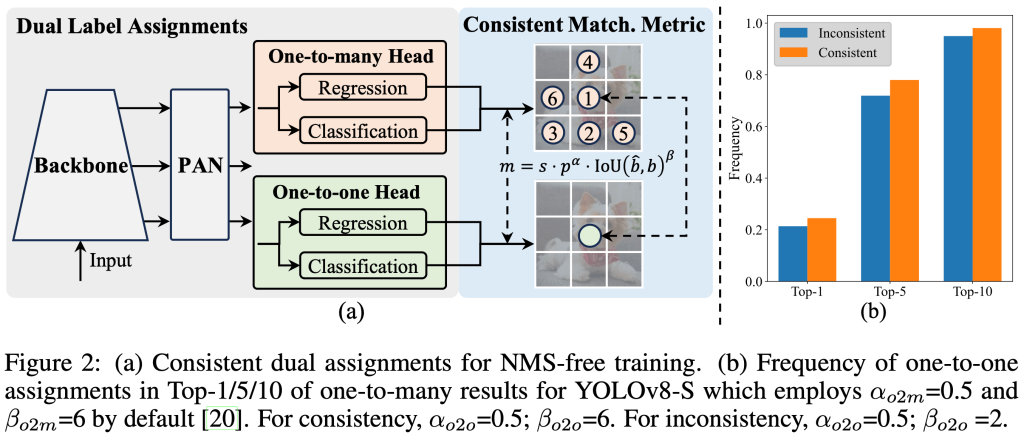
实时物体检测旨在以低延迟准确预测图像中的物体类别和位置。YOLO 系列凭借其在性能和效率之间的平衡而处于该研究的前沿。然而,对 NMS 的依赖和架构效率低下阻碍了最佳性能。YOLOv10 通过引入一致的双重分配以实现无 NMS 训练和整体效率-准确度驱动的模型设计策略来解决这些问题。
YOLOv10 由清华大学的研究人员基于Ultralytics Python 软件包开发,引入了一种实时物体检测的新方法,解决了之前 YOLO 版本中存在的后处理和模型架构缺陷。通过消除非最大抑制 (NMS) 并优化各种模型组件,YOLOv10 实现了最先进的性能,同时显著降低了计算开销。大量实验表明,它在多个模型规模上都具有出色的准确率-延迟权衡。
教程简介
本教程演示了如何使用 OpenVINO 运行和优化 PyTorch YOLO V10 的分步说明。
本教程包括以下步骤:
- 准备 PyTorch 模型
- 将 PyTorch 模型转换为 OpenVINO IR
- 使用 OpenVINO 运行模型推理
- 使用 NNCF 准备并运行优化管道
- 比较 FP16 和量化模型的性能。
- 对视频运行优化的模型推理
- 启动交互式 Gradio 演示
使用说明
这是一个独立的示例,完全依赖于其自身的代码。
关于 OpenVINO 最新版本和 Jupyter Notebook 的开发环境,可以参阅本站文章(如下),并从文章中下载包含了 OpenVINO 2024.2 最新版本和 Jupyter Notebook 环境的 docker 镜像直接运行。
优化步骤
1. Prerequisite
import os

os.environ["GIT_CLONE_PROTECTION_ACTIVE"] = "false"

%pip install -q "nncf>=2.11.0"
%pip install --pre -Uq openvino --extra-index-url https://storage.openvinotoolkit.org/simple/wheels/nightly
%pip install -q "git+https://github.com/THU-MIG/yolov10.git" --extra-index-url https://download.pytorch.org/whl/cpu
%pip install -q "torch>=2.1" "torchvision>=0.16" tqdm opencv-python "gradio>=4.19" --extra-index-url https://download.pytorch.org/whl/cpu
%pip install ipywidgets
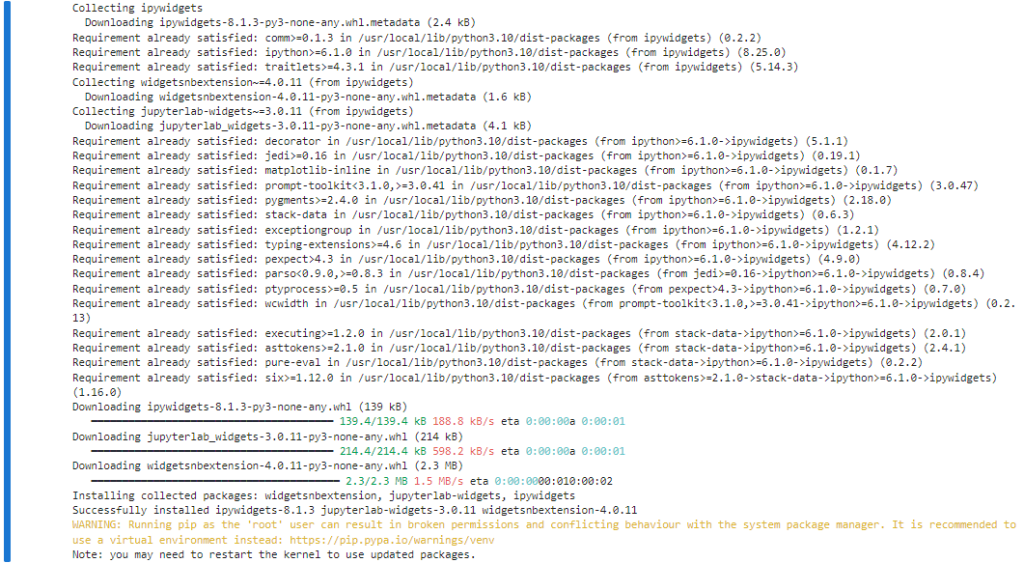
如果使用上面博文里预编译好的 docker 镜像环境,则把第 4 条命令(%pip install –pre -Uq openvino –extra-index-url https://storage.openvinotoolkit.org/simple/wheels/nightly)注释掉不用执行,否则会出现如下的版本冲突错误(因为 docker 镜像里已经安装了 2024.2 版本):

运行正常完成后则会显示如下结果:

%pip install ipywidgets注意在这一步完成后重新启动一下 python kernel,或者直接重启一下 OpenVINO 容器。
from pathlib import Path

# Fetch `notebook_utils` module
import requests

r = requests.get(
    url="https://raw.githubusercontent.com/openvinotoolkit/openvino_notebooks/latest/utils/notebook_utils.py",
)

open("notebook_utils.py", "w").write(r.text)

from notebook_utils import download_file, VideoPlayer
2. 下载 PyTorch 模型
模型作者提供了多个版本的 YOLO V10 模型。每个模型都有不同的特性,具体取决于训练参数的数量、性能和准确性。出于演示目的,我们将使用 yolov10n,但相同的步骤也适用于 YOLO V10 系列中的其他模型。
models_dir = Path("./models")
models_dir.mkdir(exist_ok=True)
model_weights_url = "https://github.com/jameslahm/yolov10/releases/download/v1.0/yolov10n.pt"
file_name = model_weights_url.split("/")[-1]
model_name = file_name.replace(".pt", "")
download_file(model_weights_url, directory=models_dir)
3. 将 PyTorch 模型导出为 OpenVINO IR 格式
如前所述,YOLO V10 代码是在 Ultralytics 库的基础上设计的,并且具有与 YOLO V8 类似的接口(您可以查看 YOLO V8 笔记本以获取有关如何使用 Ultralytics API 的更详细说明)。Ultralytics 支持使用模型类的导出方法导出 OpenVINO 模型。此外,我们可以指定负责目标输入大小、静态或动态输入形状和模型精度(FP32/FP16/INT8)的参数。INT8 量化可以在导出阶段额外执行,但为了使方法更灵活,我们考虑如何使用 NNCF 执行量化。
import types
from ultralytics.utils import ops, yaml_load, yaml_save
from ultralytics import YOLOv10
import torch

detection_labels = {
    0: "person",
    1: "bicycle",
    2: "car",
    3: "motorcycle",
    4: "airplane",
    5: "bus",
    6: "train",
    7: "truck",
    8: "boat",
    9: "traffic light",
    10: "fire hydrant",
    11: "stop sign",
    12: "parking meter",
    13: "bench",
    14: "bird",
    15: "cat",
    16: "dog",
    17: "horse",
    18: "sheep",
    19: "cow",
    20: "elephant",
    21: "bear",
    22: "zebra",
    23: "giraffe",
    24: "backpack",
    25: "umbrella",
    26: "handbag",
    27: "tie",
    28: "suitcase",
    29: "frisbee",
    30: "skis",
    31: "snowboard",
    32: "sports ball",
    33: "kite",
    34: "baseball bat",
    35: "baseball glove",
    36: "skateboard",
    37: "surfboard",
    38: "tennis racket",
    39: "bottle",
    40: "wine glass",
    41: "cup",
    42: "fork",
    43: "knife",
    44: "spoon",
    45: "bowl",
    46: "banana",
    47: "apple",
    48: "sandwich",
    49: "orange",
    50: "broccoli",
    51: "carrot",
    52: "hot dog",
    53: "pizza",
    54: "donut",
    55: "cake",
    56: "chair",
    57: "couch",
    58: "potted plant",
    59: "bed",
    60: "dining table",
    61: "toilet",
    62: "tv",
    63: "laptop",
    64: "mouse",
    65: "remote",
    66: "keyboard",
    67: "cell phone",
    68: "microwave",
    69: "oven",
    70: "toaster",
    71: "sink",
    72: "refrigerator",
    73: "book",
    74: "clock",
    75: "vase",
    76: "scissors",
    77: "teddy bear",
    78: "hair drier",
    79: "toothbrush",
}


def v10_det_head_forward(self, x):
    one2one = self.forward_feat([xi.detach() for xi in x], self.one2one_cv2, self.one2one_cv3)
    if not self.export:
        one2many = super().forward(x)

    if not self.training:
        one2one = self.inference(one2one)
        if not self.export:
            return {"one2many": one2many, "one2one": one2one}
        else:
            assert self.max_det != -1
            boxes, scores, labels = ops.v10postprocess(one2one.permute(0, 2, 1), self.max_det, self.nc)
            return torch.cat(
                [boxes, scores.unsqueeze(-1), labels.unsqueeze(-1).to(boxes.dtype)],
                dim=-1,
            )
    else:
        return {"one2many": one2many, "one2one": one2one}


ov_model_path = models_dir / f"{model_name}_openvino_model/{model_name}.xml"
if not ov_model_path.exists():
    model = YOLOv10(models_dir / file_name)
    model.model.model[-1].forward = types.MethodType(v10_det_head_forward, model.model.model[-1])
    model.export(format="openvino", dynamic=True, half=True)
    config = yaml_load(ov_model_path.parent / "metadata.yaml")
    config["names"] = detection_labels
    yaml_save(ov_model_path.parent / "metadata.yaml", config)
4. 使用 Ultralytics API 在 AUTO 设备上运行 OpenVINO 推理
现在,当我们将模型导出到 OpenVINO 时,我们可以将其直接加载到 YOLOv10 类中,其中自动推理后端将提供易于使用的用户体验,以与原始 PyTorch 模型类似的级别运行 OpenVINO YOLOv10 模型。下面的代码演示了如何使用 Ultralytics API 在单个图像上运行 OpenVINO 导出模型的推理。AUTO 设备将用于启动模型。
ov_yolo_model = YOLOv10(ov_model_path.parent, task="detect")from PIL import Image
IMAGE_PATH = Path("./data/coco_bike.jpg")
download_file(
url="https://storage.openvinotoolkit.org/repositories/openvino_notebooks/data/data/image/coco_bike.jpg",
filename=IMAGE_PATH.name,
directory=IMAGE_PATH.parent,
)
res = ov_yolo_model(IMAGE_PATH, iou=0.45, conf=0.2)
Image.fromarray(res[0].plot()[:, :, ::-1])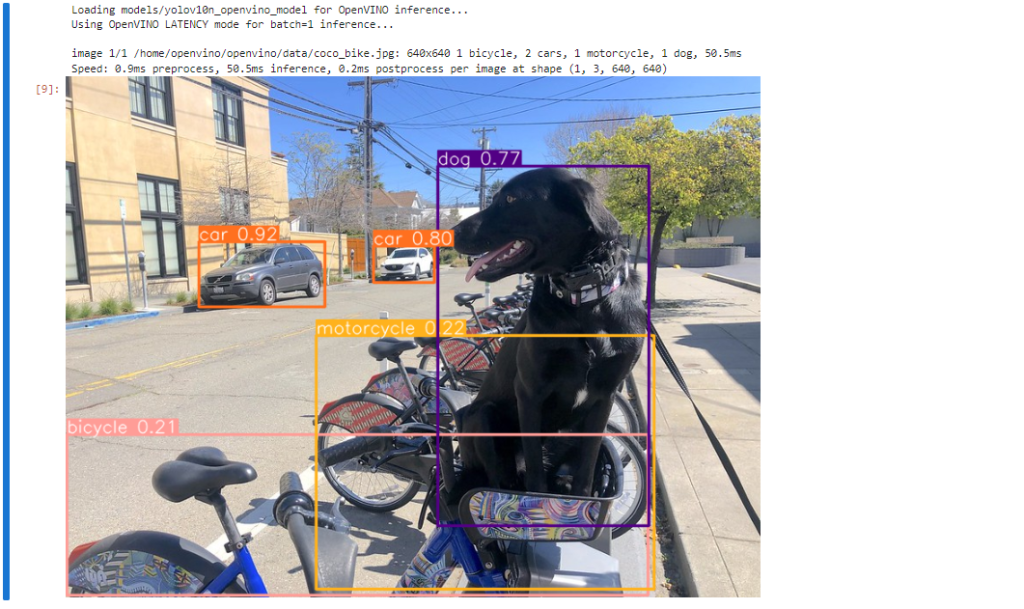
5. 使用 Ultralytics API 在选定设备上运行 OpenVINO 推理
在这一部分,您可以选择推理设备来运行模型推理,以便将结果与 AUTO 设备进行比较。
import openvino as ov

import ipywidgets as widgets

core = ov.Core()

device = widgets.Dropdown(
    options=core.available_devices + ["AUTO"],
    value="CPU",
    description="Device:",
    disabled=False,
)

device
可以看到,我的设备支持 CPU,GPU(集成显卡)和 AUTO 三种设备设置。如果是第14代 Meteor Lake 平台的话,应该还会有 NPU 可以选择。

ov_model = core.read_model(ov_model_path)

# load model on selected device
if "GPU" in device.value or "NPU" in device.value:
    ov_model.reshape({0: [1, 3, 640, 640]})
ov_config = {}
if "GPU" in device.value:
    ov_config = {"GPU_DISABLE_WINOGRAD_CONVOLUTION": "YES"}
det_compiled_model = core.compile_model(ov_model, device.value, ov_config)
ov_yolo_model.predictor.model.ov_compiled_model = det_compiled_modelres = ov_yolo_model(IMAGE_PATH, iou=0.45, conf=0.2)
Image.fromarray(res[0].plot()[:, :, ::-1])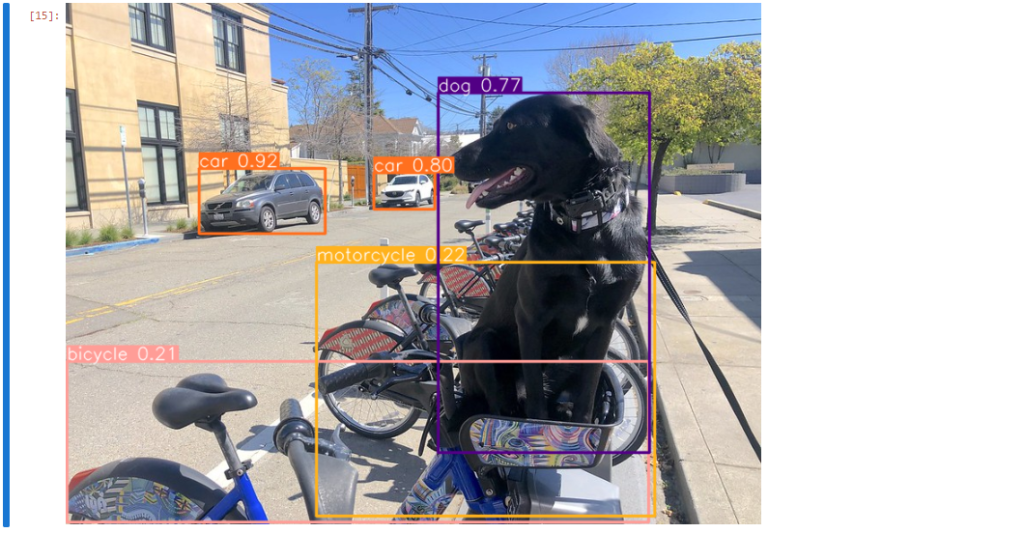
6. 使用 NNCF 训练后量化 API 优化模型
NNCF 提供了一套高级算法,用于 OpenVINO 中的神经网络推理优化,同时将准确度下降降至最低。我们将在训练后模式下使用 8 位量化(不使用微调管道)来优化 YOLOv10。
优化过程包含以下步骤:
创建用于量化的数据集。运行 nncf.quantize 以获取优化的模型。使用 openvino.save_model 函数序列化 OpenVINO IR 模型。量化是一个耗时且耗内存的过程,您可以使用下面的复选框跳过此步骤:
import ipywidgets as widgets

int8_model_det_path = models_dir / "int8" / f"{model_name}_openvino_model/{model_name}.xml"
ov_yolo_int8_model = None

to_quantize = widgets.Checkbox(
    value=True,
    description="Quantization",
    disabled=False,
)

to_quantize
# Fetch skip_kernel_extension module
r = requests.get(
    url="https://raw.githubusercontent.com/openvinotoolkit/openvino_notebooks/latest/utils/skip_kernel_extension.py",
)
open("skip_kernel_extension.py", "w").write(r.text)

%load_ext skip_kernel_extension
7. 准备量化数据集
要开始量化,我们需要准备数据集。我们将使用 MS COCO 数据集中的验证子集进行模型量化,并使用 Ultralytics 验证数据加载器准备输入数据。
%%skip not $to_quantize.value

from zipfile import ZipFile

from ultralytics.data.utils import DATASETS_DIR

if not int8_model_det_path.exists():

    DATA_URL = "http://images.cocodataset.org/zips/val2017.zip"
    LABELS_URL = "https://github.com/ultralytics/yolov5/releases/download/v1.0/coco2017labels-segments.zip"
    CFG_URL = "https://raw.githubusercontent.com/ultralytics/ultralytics/v8.1.0/ultralytics/cfg/datasets/coco.yaml"

    OUT_DIR = DATASETS_DIR

    DATA_PATH = OUT_DIR / "val2017.zip"
    LABELS_PATH = OUT_DIR / "coco2017labels-segments.zip"
    CFG_PATH = OUT_DIR / "coco.yaml"

    download_file(DATA_URL, DATA_PATH.name, DATA_PATH.parent)
    download_file(LABELS_URL, LABELS_PATH.name, LABELS_PATH.parent)
    download_file(CFG_URL, CFG_PATH.name, CFG_PATH.parent)

    if not (OUT_DIR / "coco/labels").exists():
        with ZipFile(LABELS_PATH, "r") as zip_ref:
            zip_ref.extractall(OUT_DIR)
        with ZipFile(DATA_PATH, "r") as zip_ref:
            zip_ref.extractall(OUT_DIR / "coco/images")
上述的 warning 信息并不影响使用。如果介意的话,可以修改 ~/jupyter_notebook_config.py 的相应参数。
%%skip not $to_quantize.value

from ultralytics.utils import DEFAULT_CFG
from ultralytics.cfg import get_cfg
from ultralytics.data.converter import coco80_to_coco91_class
from ultralytics.data.utils import check_det_dataset

if not int8_model_det_path.exists():
    args = get_cfg(cfg=DEFAULT_CFG)
    args.data = str(CFG_PATH)
    det_validator = ov_yolo_model.task_map[ov_yolo_model.task]["validator"](args=args)

    det_validator.data = check_det_dataset(args.data)
    det_validator.stride = 32
    det_data_loader = det_validator.get_dataloader(OUT_DIR / "coco", 1)
NNCF 提供 nncf.Dataset wrapper,用于在量化管道中使用原生框架数据加载器。此外,我们指定转换函数,该函数将负责以模型预期格式准备输入数据。
%%skip not $to_quantize.value

import nncf
from typing import Dict


def transform_fn(data_item:Dict):
    """
    Quantization transform function. Extracts and preprocess input data from dataloader item for quantization.
    Parameters:
       data_item: Dict with data item produced by DataLoader during iteration
    Returns:
        input_tensor: Input data for quantization
    """
    input_tensor = det_validator.preprocess(data_item)['img'].numpy()
    return input_tensor

if not int8_model_det_path.exists():
    quantization_dataset = nncf.Dataset(det_data_loader, transform_fn)
8. 量化并保存 INT8 模型
nncf.quantize 函数提供了模型量化的接口。它需要 OpenVINO 模型和量化数据集的实例。可选地,可以提供一些用于配置量化过程的附加参数(量化样本数、预设、忽略范围等)。YOLOv10 模型包含非 ReLU 激活函数,这需要对激活进行非对称量化。为了获得更好的结果,我们将使用混合量化预设。它提供权重的对称量化和激活的非对称量化。
注意:模型训练后量化是一个耗时的过程。请耐心等待,这可能需要几分钟,具体取决于您的硬件。
%%skip not $to_quantize.value

import shutil

if not int8_model_det_path.exists():
    quantized_det_model = nncf.quantize(
        ov_model,
        quantization_dataset,
        preset=nncf.QuantizationPreset.MIXED,
    )

    ov.save_model(quantized_det_model,  int8_model_det_path)
    shutil.copy(ov_model_path.parent / "metadata.yaml", int8_model_det_path.parent / "metadata.yaml")
9. 运行优化后的模型推理
INT8 量化模型的使用方法与量化前的模型相同。让我们检查一下量化模型在单张图片上的推理结果。
9.1 在 AUTO 设备上运行优化后的模型
%%skip not $to_quantize.value
ov_yolo_int8_model = YOLOv10(int8_model_det_path.parent, task="detect")
%%skip not $to_quantize.value
res = ov_yolo_int8_model(IMAGE_PATH, iou=0.45, conf=0.2)
Image.fromarray(res[0].plot()[:, :, ::-1])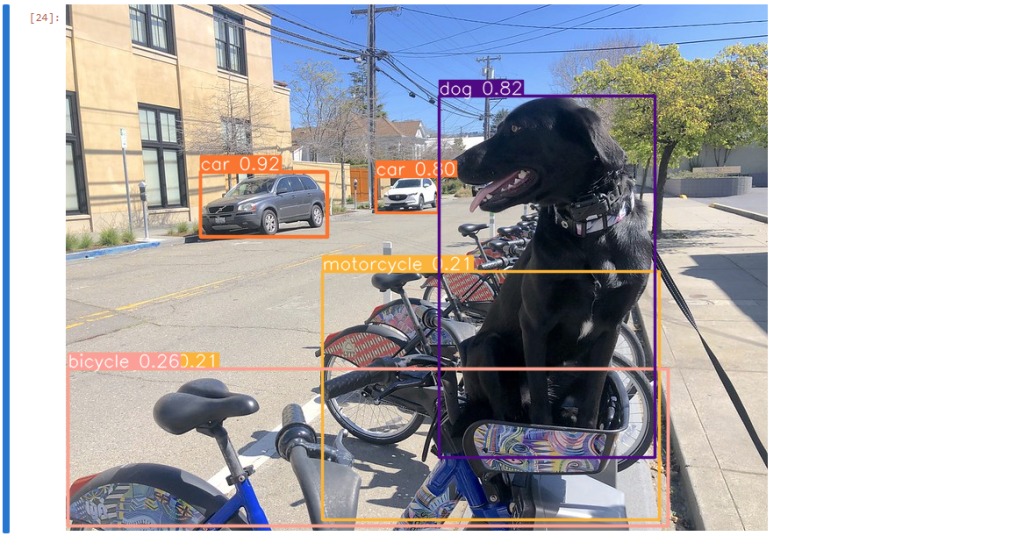
9.2 在指定的设备上运行优化后的模型
%%skip not $to_quantize.value

device
%%skip not $to_quantize.value
ov_config = {}
if "GPU" in device.value or "NPU" in device.value:
ov_model.reshape({0: [1, 3, 640, 640]})
ov_config = {}
if "GPU" in device.value:
ov_config = {"GPU_DISABLE_WINOGRAD_CONVOLUTION": "YES"}
quantized_det_model = core.read_model(int8_model_det_path)
quantized_det_compiled_model = core.compile_model(quantized_det_model, device.value, ov_config)
ov_yolo_int8_model.predictor.model.ov_compiled_model = quantized_det_compiled_model
res = ov_yolo_int8_model(IMAGE_PATH, iou=0.45, conf=0.2)
Image.fromarray(res[0].plot()[:, :, ::-1])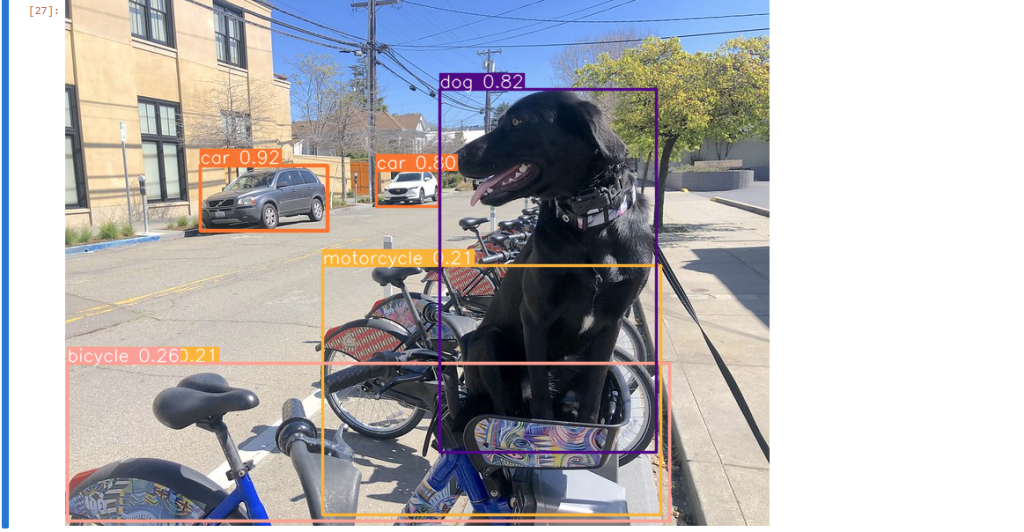
10. 比较原始模型和优化后的模型
10.1 模型大小
ov_model_weights = ov_model_path.with_suffix(".bin")
print(f"Size of FP16 model is {ov_model_weights.stat().st_size / 1024 / 1024:.2f} MB")
if int8_model_det_path.exists():
    ov_int8_weights = int8_model_det_path.with_suffix(".bin")
    print(f"Size of model with INT8 compressed weights is {ov_int8_weights.stat().st_size / 1024 / 1024:.2f} MB")
    print(f"Compression rate for INT8 model: {ov_model_weights.stat().st_size / ov_int8_weights.stat().st_size:.3f}")
10.2 性能
10.2.1 fp16 性能
!benchmark_app -m $ov_model_path -d $device.value -api async -shape "[1,3,640,640]" -t 15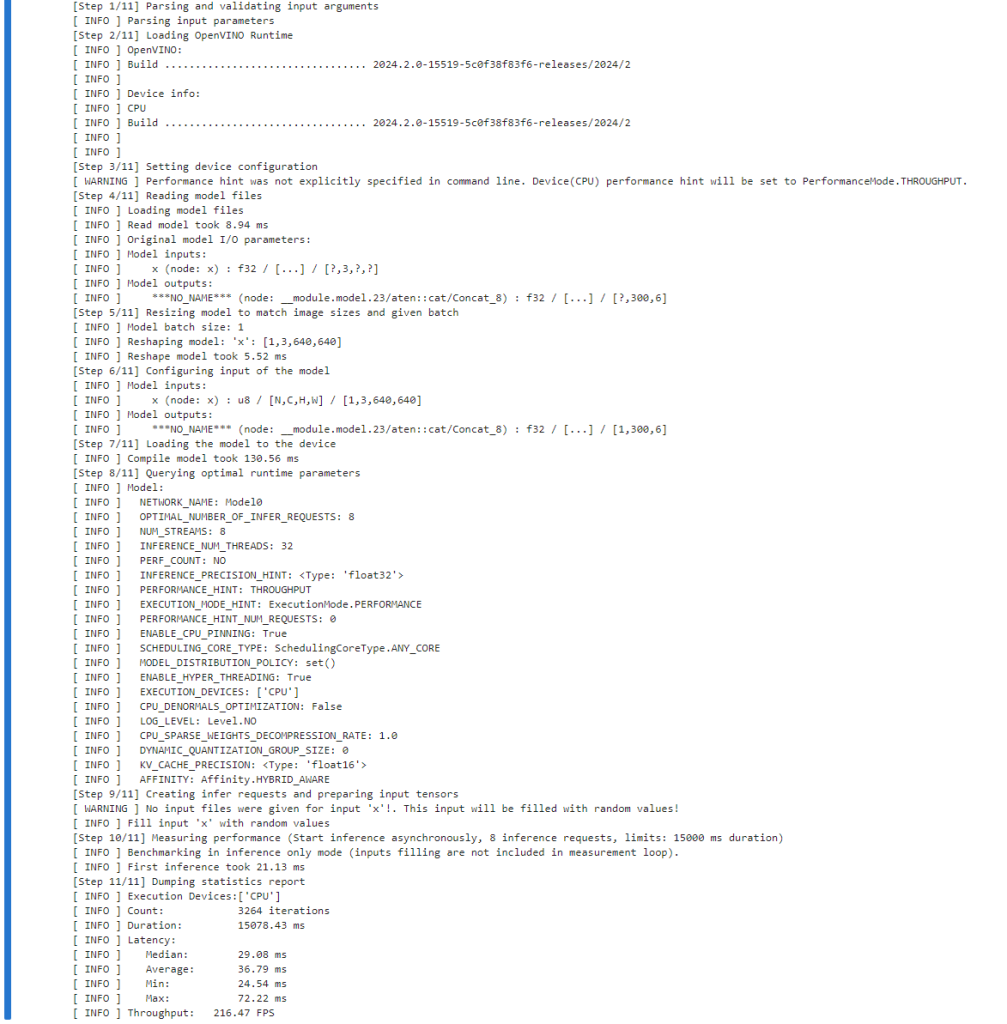
10.2.2 int8 性能
if int8_model_det_path.exists():
    !benchmark_app -m $int8_model_det_path -d $device.value -api async -shape "[1,3,640,640]" -t 15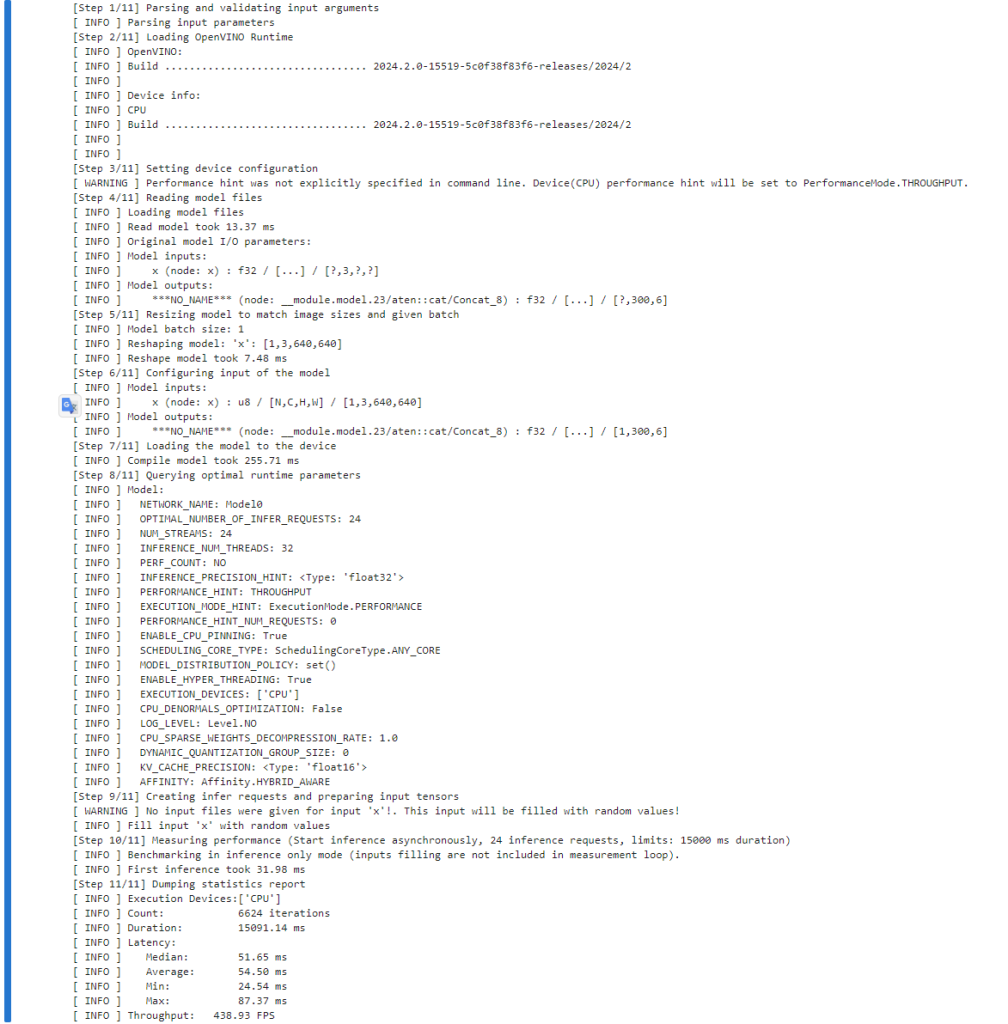
可以看到 int8 的性能是 fp16 的性能的两倍左右。
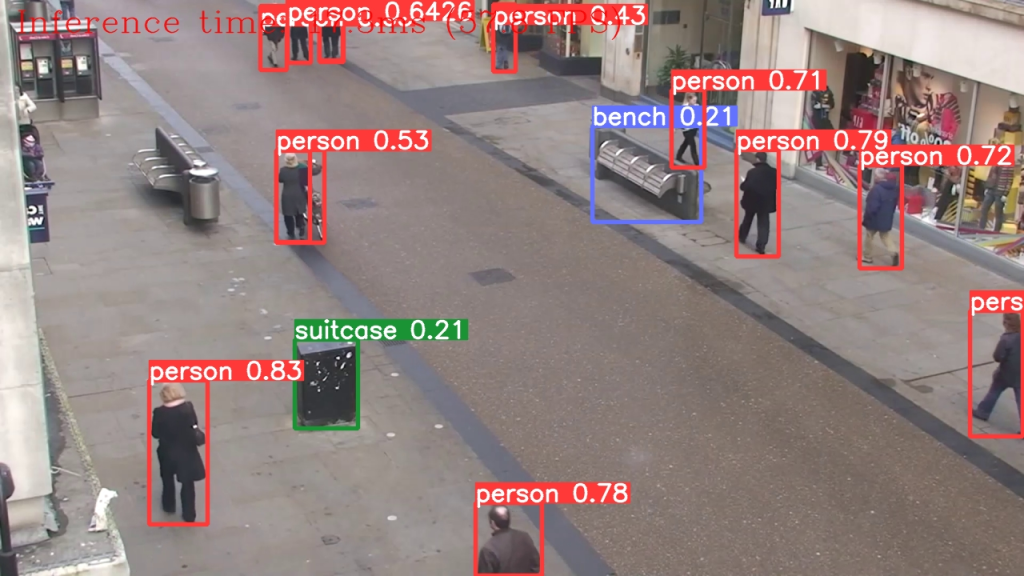
11. 视频演示
以下代码对视频运行模型推理:
import collections
import time
from IPython import display
import cv2
import numpy as np


# Main processing function to run object detection.
def run_object_detection(
    source=0,
    flip=False,
    use_popup=False,
    skip_first_frames=0,
    det_model=ov_yolo_int8_model,
    device=device.value,
):
    player = None
    try:
        # Create a video player to play with target fps.
        player = VideoPlayer(source=source, flip=flip, fps=30, skip_first_frames=skip_first_frames)
        # Start capturing.
        player.start()
        if use_popup:
            title = "Press ESC to Exit"
            cv2.namedWindow(winname=title, flags=cv2.WINDOW_GUI_NORMAL | cv2.WINDOW_AUTOSIZE)

        processing_times = collections.deque()
        while True:
            # Grab the frame.
            frame = player.next()
            if frame is None:
                print("Source ended")
                break
            # If the frame is larger than full HD, reduce size to improve the performance.
            scale = 1280 / max(frame.shape)
            if scale < 1:
                frame = cv2.resize(
                    src=frame,
                    dsize=None,
                    fx=scale,
                    fy=scale,
                    interpolation=cv2.INTER_AREA,
                )
            # Get the results.
            input_image = np.array(frame)

            start_time = time.time()
            detections = det_model(input_image, iou=0.45, conf=0.2, verbose=False)
            stop_time = time.time()
            frame = detections[0].plot()

            processing_times.append(stop_time - start_time)
            # Use processing times from last 200 frames.
            if len(processing_times) > 200:
                processing_times.popleft()

            _, f_width = frame.shape[:2]
            # Mean processing time [ms].
            processing_time = np.mean(processing_times) * 1000
            fps = 1000 / processing_time
            cv2.putText(
                img=frame,
                text=f"Inference time: {processing_time:.1f}ms ({fps:.1f} FPS)",
                org=(20, 40),
                fontFace=cv2.FONT_HERSHEY_COMPLEX,
                fontScale=f_width / 1000,
                color=(0, 0, 255),
                thickness=1,
                lineType=cv2.LINE_AA,
            )
            # Use this workaround if there is flickering.
            if use_popup:
                cv2.imshow(winname=title, mat=frame)
                key = cv2.waitKey(1)
                # escape = 27
                if key == 27:
                    break
            else:
                # Encode numpy array to jpg.
                _, encoded_img = cv2.imencode(ext=".jpg", img=frame, params=[cv2.IMWRITE_JPEG_QUALITY, 100])
                # Create an IPython image.
                i = display.Image(data=encoded_img)
                # Display the image in this notebook.
                display.clear_output(wait=True)
                display.display(i)
    # ctrl-c
    except KeyboardInterrupt:
        print("Interrupted")
    # any different error
    except RuntimeError as e:
        print(e)
    finally:
        if player is not None:
            # Stop capturing.
            player.stop()
        if use_popup:
            cv2.destroyAllWindows()
use_int8 = widgets.Checkbox(
value=ov_yolo_int8_model is not None,
description="Use int8 model",
disabled=ov_yolo_int8_model is None,
)
use_int8
WEBCAM_INFERENCE = False

if WEBCAM_INFERENCE:
    VIDEO_SOURCE = 0  # Webcam
else:
    download_file(
        "https://storage.openvinotoolkit.org/repositories/openvino_notebooks/data/data/video/people.mp4",
        directory="data",
    )
    VIDEO_SOURCE = "data/people.mp4"
run_object_detection(
    det_model=ov_yolo_model if not use_int8.value else ov_yolo_int8_model,
    source=VIDEO_SOURCE,
    flip=True,
    use_popup=False,
)
12. Gradio 交互演示
import gradio as gr


def yolov10_inference(image, int8, conf_threshold, iou_threshold):
    model = ov_yolo_model if not int8 else ov_yolo_int8_model
    results = model(source=image, iou=iou_threshold, conf=conf_threshold, verbose=False)[0]
    annotated_image = Image.fromarray(results.plot())

    return annotated_image


with gr.Blocks() as demo:
    gr.HTML(
        """
    <h1 style='text-align: center'>
    YOLOv10: Real-Time End-to-End Object Detection using OpenVINO
    </h1>
    """
    )
    with gr.Row():
        with gr.Column():
            image = gr.Image(type="numpy", label="Image")
            conf_threshold = gr.Slider(
                label="Confidence Threshold",
                minimum=0.1,
                maximum=1.0,
                step=0.1,
                value=0.2,
            )
            iou_threshold = gr.Slider(
                label="IoU Threshold",
                minimum=0.1,
                maximum=1.0,
                step=0.1,
                value=0.45,
            )
            use_int8 = gr.Checkbox(
                value=ov_yolo_int8_model is not None,
                visible=ov_yolo_int8_model is not None,
                label="Use INT8 model",
            )
            yolov10_infer = gr.Button(value="Detect Objects")

        with gr.Column():
            output_image = gr.Image(type="pil", label="Annotated Image")

        yolov10_infer.click(
            fn=yolov10_inference,
            inputs=[
                image,
                use_int8,
                conf_threshold,
                iou_threshold,
            ],
            outputs=[output_image],
        )
    examples = gr.Examples(
        [
            "data/coco_bike.jpg",
        ],
        inputs=[
            image,
        ],
    )


try:
    demo.launch(debug=True)
except Exception:
    demo.launch(debug=True, share=True)